Integration Quickstart
Please note that as of August 1st, 2024, EnvKey Cloud is beginning a six month wind down. It will shut down on February 1st, 2025. New registrations are now disabled for EnvKey Cloud. Learn more here.
Create or initialize an app
When you create a new app in EnvKey, you'll be asked for the corresponding project's root directory so that a .envkey config file can be created there. This file is not sensitive and should be checked in to version control.
If you need to create a .envkey file for an existing app, navigate to the corresponding project's root directory in a terminal and execute envkey init.
Connect an environment with EnvKey
Local development environment
If you run your dev environment on Docker, a VM, or a web server like Apache/FastCGI that runs processes under its own OS user (e.g. _www, www-data) go to using local development ENVKEYs.
Otherwise, just make sure the EnvKey App and CLI are installed, that you're signed in to your EnvKey organization, and that your project's root directory has a .envkey file in it. Your development environment will be connected automatically. From here, you can skip ahead to 'Integrate with your app'.
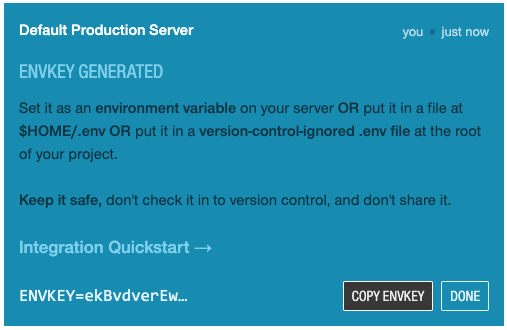
Server environment
First, generate a server ENVKEY.
Open up the EnvKey App, sign in, select the application you want to integrate with in the sidebar, and then select the ENVKEYs tab. Assuming you have permission to manage servers, you'll see a Server Keys section at the top. Click the Generate Server Key button, then copy the generated ENVKEY.
Or you can use the EnvKey CLI:
envkey servers createIntegrate with your app
Last step: now you can either use the envkey-source tool directly or an EnvKey language-specific wrapper library to pull in your development secrets and config at the entrypoint of your app.
Node.js
$ npm install envkey --saveimport 'envkey'
// That's it. process.env contains the latest config.
var stripe = require('stripe')(process.env.STRIPE_SECRET_KEY)Python
$ pip install envkeyimport envkey
# That's it. os.environ contains the latest config.
stripe.api_key = os.environ['STRIPE_SECRET_KEY']Go
$ go get github.com/envkey/envkeygoimport _ "github.com/envkey/envkeygo"
// That's it. Access the latest config with os.Getenv
stripe.Key = os.Getenv("STRIPE_SECRET_KEY")Ruby
gem 'envkey'$ bundle install# That's it. ENV contains the latest config.
Stripe.api_key = ENV['STRIPE_SECRET_KEY']PHP
$ composer require envkey/envkey-php require_once 'vendor/autoload.php'; // Include the Composer autoloader
// That's it. Access the latest config with getenv
$stripe = new \Stripe\StripeClient(getenv('STRIPE_SECRET_KEY'));Any language with envkey-source
Whether in development or on a server, replace whatever command you use to start your app with the following:
$ envkey-source -- start-app-commandOr to type a bit less, use the es alias:
$ es -- start-app-commandYou might also want to add the --watch / -w flag to reload your app when there's a change in the environment:
$ es -w -- start-app-commandIn development, you might also want to add the --cache / -c flag, which tells envkey-source to maintain an encrypted cache of your config in the local filesystem. The cache allows you to keep working if you lose your internet connection. This flag isn't recommended in production.
$ es -wc -- start-app-commandHere's another useful trick in development--this allows you to load the latest environment variables in the current shell whenever you enter a directory (much like the direnv library):
echo $'\n\neval "$(es --hook bash)"\n' >> ~/.bash_profileOne last tip for servers. For a server ENVKEY that has multiple server instances, processes, or threads connected, you may want to add the --rolling flag, so that when EnvKey reloads your app after a change in the environment, it performs a rolling reload across all connections in order to avoid downtime.
$ es -w --rolling -- start-app-commandMore on envkey-source
Check out the envkey-source docs for more details on the options available when using envkey-source. You can overwrite specific variables, detect which specific variables have changed when there's an update, use an in-memory cache to eliminate latency, and more.
Updated about 1 year ago